Friday, 30 March 2018

smart asp.net mvc wizard part 1

Smart asp.net mvc wizard part 1

In this series of articles I will build a wizard for asp.net mvc starting from object model finished by user interface on asp.net mvc core web application.
(You can use code and concept to build the wizard on asp.net forms, asp.net mvc … or any other web language … same concept)
The wizard will be dynamic and smart where you can use it for small or enterprise applications.
The object model will be written in C# where anyone can translate it to any other language like Java, Ruby.

The wizard will not use any JavaScript or any client side framework only  server side code.


The Final Result after series of articles will be as below image:


Asp.Net MVC Smart Wizard Final Result


Problem:
We have an enterprise application with many type of users with each type has different input views (steps, different wizards).
 To solve the problem we need dynamic and smart wizard with smart navigation commands (next, previous, finish, skip …) and bookmarks, also we need the wizard to memory the last active step for each user.
The wizard steps or views will be loaded dynamically from configuration file (.net core JSON file)
Each step in wizard will has its own controller and view(s).

Solution:
We will start by writing the object model based on object oriented best practices,
You can consider this part as a tutorial or real object oriented sample for smart wizard.

If we think in wizard in abstraction way we will find out that wizard consist of the following parts (see below image :  asp.net mvc wizard components):
  1. Wizard Itself: Container for other parts of the wizard.
  2. Wizard Step: any view, html page or form.
  3. Wizard Step Collection : collection of steps
  4. Bookmark: top bar that show the title of each step.
  5. Bookmark state : the states of each bookmark
    1. Active(clickable)
    2. Disabled (clickable) ,
    3. Current (you are on this, sure it clickable).
  6. Navigation command: next, previous, skip, finish…
  7. Wizard Navigator: this the coordinator it controls the moving from step to step (backward, forward).
  8. Wizard State: The state of wizard will be saved as a small JSON file in MS SQL Database just to remember where the user were, just to memory the steps for users.
  9. Wizard navigator service: an interface that load and save the wizard state, for me I will save and load the state in JSON file in MS SQL Server, you can implement it to save in any data store like MySQL, session …..
Main Idea of wizard:
Each wizard consist of many steps and I can move from step to another only when that step is completed, you can’t jump steps is it’s not completed.
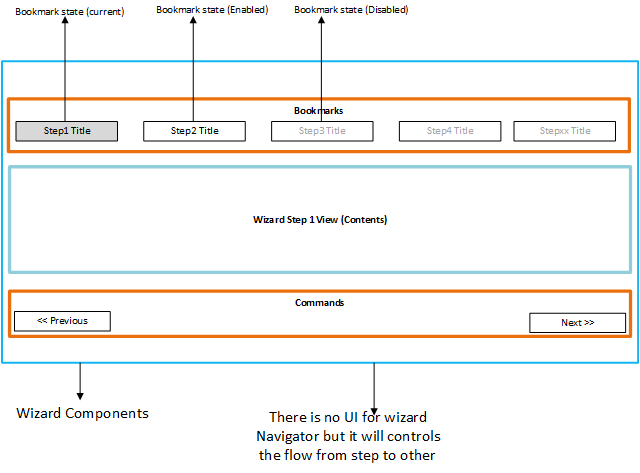


Asp.Net MVC Smart Wizard Components


Let us start explain the object model and class diagram for each part of the wizard, by the way I will program to interface for some parts to meet object oriented principles (you can change it as you wish)
Below table is a brief of the components followed by details:
Part Class Name Implement Interface
Wizard Itself BaseWizard
Wizard step WizardStep
Wizard stepCollection Collection of WizardStep (Keyed Collection)
Bookmark Bookmark
Bookmark state BookmarkState
Navigation command NavigationCommand
Wizard Navigator WizardNavigator IWizardNavigator
Wizard State WizardState
Wizard navigator service In UI will create the implementation IWizardNavigatorService


Class Diagram:
Below is the class diagram for the wizard components:


Asp.Net MVC Smart Wizard Class Diagram


Click here for next part (Part 2)


Wednesday, 21 March 2018

CSS classes to Styling SharePoint 2013

Body and Ribbon


Suite Bar - Left Side:  #suiteBarLeft
Ribbon Container : #globalNavBox
Suite Bar - Right : #suiteBarRight
Main Body :  body #s4-workspace


Search Box


Search Box Border: .ms-srch-sb-border
Search Box Border Hover : .ms-srch-sb-border:hover
Search Box Border when clicked : .ms-srch-sb-borderFocused
Search Box Body:.ms-srch-sb
Search Box Submit Button : .ms-srch-sb-searchImg
Search Box Submit HREF : .ms-srch-sb > .ms-srch-sb-searchLink
Search Box Drop Down Arrow : .ms-srch-sb-navImg
Search Box Dropdown Arrow HREF : HREF.ms-srch-sb > .ms-srch-sb-navLink
Search Box Input Text Box : .ms-srch-sb > input

Tuesday, 20 March 2018

SharePoint Continuous Integration and continuous delivery Deployment task

If your looking to deploy packages files (wsp) from build serve to sharepoint server either staging,testing or production.

we will run a powershell script on Build server  :

$password = $env:deploypassword | ConvertTo-SecureString -asPlainText -Force

$username = $env:deployusername

$cred = New-Object
System.Management.Automation.PSCredential($username,$password)

$session = New-PSSession -ComputerName "deployment server nmae or IP" -Authentication CredSSP –Credential $cred

Invoke-Command -Session  $session -scriptblock {script path on sharepoint server}


Environments Variables:
$env:deployusername :user name has ability to deploy on sharepoint
$env:deploypassword : password for deployusername
$username: user name can connect to sharepoint server
$password: password for username.


Friday, 3 March 2017

asp.net mvc core image handler

It's a while since my last blog , today i am gonna write an asp.net mvc image handler (Middle-ware) with following assumptions:

  1. asp.net mvc core web application based on .net framework/.net core
  2. NuGet package for resize images Magick.NET-Q16-AnyCPU
  3. Image Manager in code used to get Image by id (replace it with your code)
  4. Image will be stored in Database (Binary + MimeType)
  5. Url will be {SiteUrrl}/images?id=xx&h=xx&y=xx
  6. id is image id in database
  7. h image height
  8. w image width


Step 1:Create ImageMiddleware class
Step 2:Create ImageMiddlewareExtensions class
Step 3:Register ImageMiddleware class in startup class


Source Code (Links on GitHub):
ImageMiddleware Class
ImageMiddlewareExtensions


Then in your startup class Add:

 app.UseImageMiddleware("/images");


Testing:
My site url is : http://localhost:14600

http://localhost:14600/images?id=12&w=150&h=150


http://localhost:14600/images?id=12&w=400&h=400


Wednesday, 23 December 2015

Value does not fall within the expected range - SharePoint Client Object Model


While working on SharePoint 2013 client object model to upload files to servers i have received the following error:

Value does not fall within the expected range Sharepoint

UploadLayoutsPageBase: Microsoft.SharePoint.Client.ServerException: Value does not fall within the expected range.  
 at Microsoft.SharePoint.Client.ClientRequest.ProcessResponseStream(Stream responseStream)  
 at Microsoft.SharePoint.Client.ClientRequest.ProcessResponse()


Solution:

If you are using full file path , make sure not to add any extra slash

Valid :   http://10.151.0.67:8010/sites/docs_1/Contact/20/photo_v1.jpg
Invalid : http://10.151.0.67:8010//sites/docs_1/Contact/20/photo_v1.jpg


Some people saying that you have to give relative file URL not full path , for me i used to give full path and it's working very well.


Value does not fall within the expected range  is a common error just like sorry something went wrong , please try again later.

Thursday, 23 April 2015

Sharepoint2013 Adding Editor Style


SharePoint 2013 enables you to add specific styles to your custom CSS
that can be accessed through the ribbon and used by content authors on your site


  • Font Face—The font face used on the selected text.
  • Font Size—The size of the selected text.
  • Highlight Color—Background color behind the selected text. 
  • Font Color—The selection text color. 
  • Styles Page Element—An HTML element will be injected around the        selection and a style will be applied to that element.
  • Styles Text Style—A specific style will be applied to the selection.


/*--Font Face--*/
.ms-rteFontFace-SECFontFace {
-ms-name: "SEC Font";
font-family: 'Comic Sans MS';
}

/*--Font Size--*/
.ms-rteFontSize-SECFontSize {
font-size: 25px;
}

/*--Highlight Color--*/
.ms-rteBackColor-SECBackColor {
background-color: #25408f;
-ms-name: "";
-ms-color: "SEC Blue";
}

/*--Font Color--*/
.ms-rteForeColor-SECForeColor {
color: #e98013;
-ms-name: "";
-ms-color: "SEC Orange";
}

/*--Styles - Page Element--*/
DIV.ms-rteElement-SECElement {
-ms-name: "SEC Element";
}


.ms-rteElement-SECElement {
border: 1px solid #e98013;
}

/*--Styles - Text Styles--*/
.ms-rteStyle-SECStyle {
-ms-name: "SEC style";
color: #e98013;
font-size: 25px;
}


After that you will see the Font in Editor as in below image:


Monday, 22 December 2014

SharePoint List Query Throttling NOT Apply number of results returned by your query

Important note you may not know:


What Is Query Throttling (different meaning)?
The list view threshold does not apply simply to the number of results returned by your query. Instead, it restricts the numbers of database rows that can be accessed in order to complete execution of the query 


What does it mean?
suppose you are working with a list that contains 10,000 items. If you were to build a query that returns the first 100 items sorted by the ID field, the query would execute without issue because the ID column is always indexed. However, if you were to build a query that returns the first 100 items sorted by a non-indexed Title field, the query would have to scan all 10,000 rows in the content database in order to determine the sort order by title before returning the first 100 items. Because of this, the query would be throttled, and rightly so—this is a resource-intensive operation.